Many photographs, despite good composition, can often lack that captivating polish or depth. Achieving a professional and visually appealing aesthetic often seems like a complex or time-consuming endeavor for photographers and digital artists.
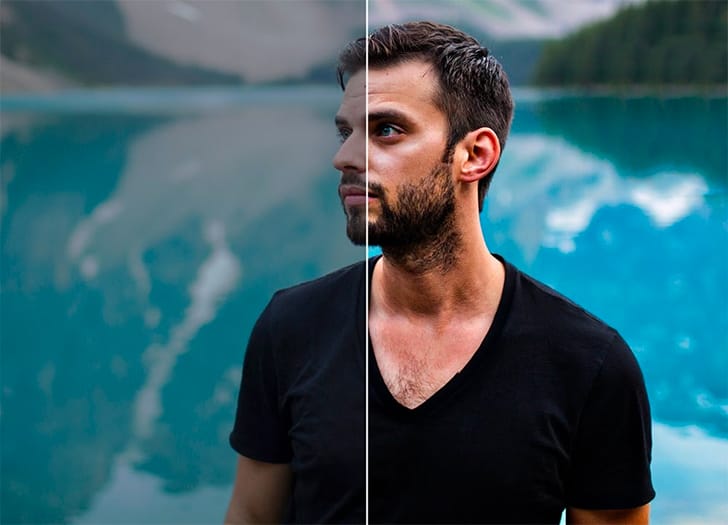
This tutorial introduces a simple yet powerful Photoshop technique, sometimes referred to as the "euro glow" or "euro tint," designed to quickly elevate the quality of any image. Readers will learn how a few clicks can add contrast, vibrance, and a subtle softening effect, enhancing both portraits and landscapes.
Watch the Tutorial: Apply the 'Euro Glow' Effect
Any links or downloads mentioned by the creator are available only on YouTube
Understanding the 'Glow' Effect: Blending Modes and Blur
Effective photo enhancement frequently relies on the strategic use of layers and blending modes to introduce depth and atmosphere. Rather than making destructive direct edits, blending modes like Overlay and Soft Light non-destructively alter how layers interact. These modes influence contrast and color, adding vibrancy or subtlety without permanently modifying the original pixel data, offering immense flexibility in artistic expression.
Similarly, applying a controlled blur, specifically a Gaussian Blur to a duplicated layer, serves more than just de-focusing. When combined with an appropriate blending mode, this blur can create a soft, ethereal glow. This technique is particularly effective for smoothing out textures such as skin and hair, transforming "straw-like" hair into "silky" strands, and diffusing light to achieve a more flattering overall aesthetic. This layered approach allows for precise control, as artists can then use layer masks to selectively refine areas, bringing back sharpness where necessary while maintaining the desired soft glow.
Quick Steps to Apply the 'Euro Glow' in Photoshop
- Begin by duplicating your background layer (
Ctrl+Jon Windows orCommand+Jon Mac) to ensure non-destructive editing and preserve your original image. - Experiment with blend modes, choosing
Overlayfor a strong contrast and color pop, orSoft Lightfor a more subtle enhancement. Adjust the Opacity of the layer to fine-tune the intensity of the effect. - Apply a
Gaussian Blurto the duplicated layer. The goal is to find a "sweet spot" where a soft glow emerges without making the image appear overly blurred or unnatural. The optimal blur radius will vary based on the image's resolution and specific content. - Utilize a layer mask to selectively apply or remove the effect. Paint with black on the layer mask to bring back sharpness and detail to important areas, such as the eyes and lip lines, while allowing the glow to soften other areas like skin and hair. This can also help smooth out minor imperfections like chapped lips or acne.
- Remember this technique's versatility: it effectively enhances portraits by improving skin and hair texture, and also adds depth and atmosphere to landscapes or other types of photos.
Explore More Photoshop Enhancement Tutorials
Discover additional techniques and resources to further refine your image editing skills.