Creating Circular Text with Motion Blur Effects in Photoshop

Creating Circular Text with Motion Blur Effects in Photoshop

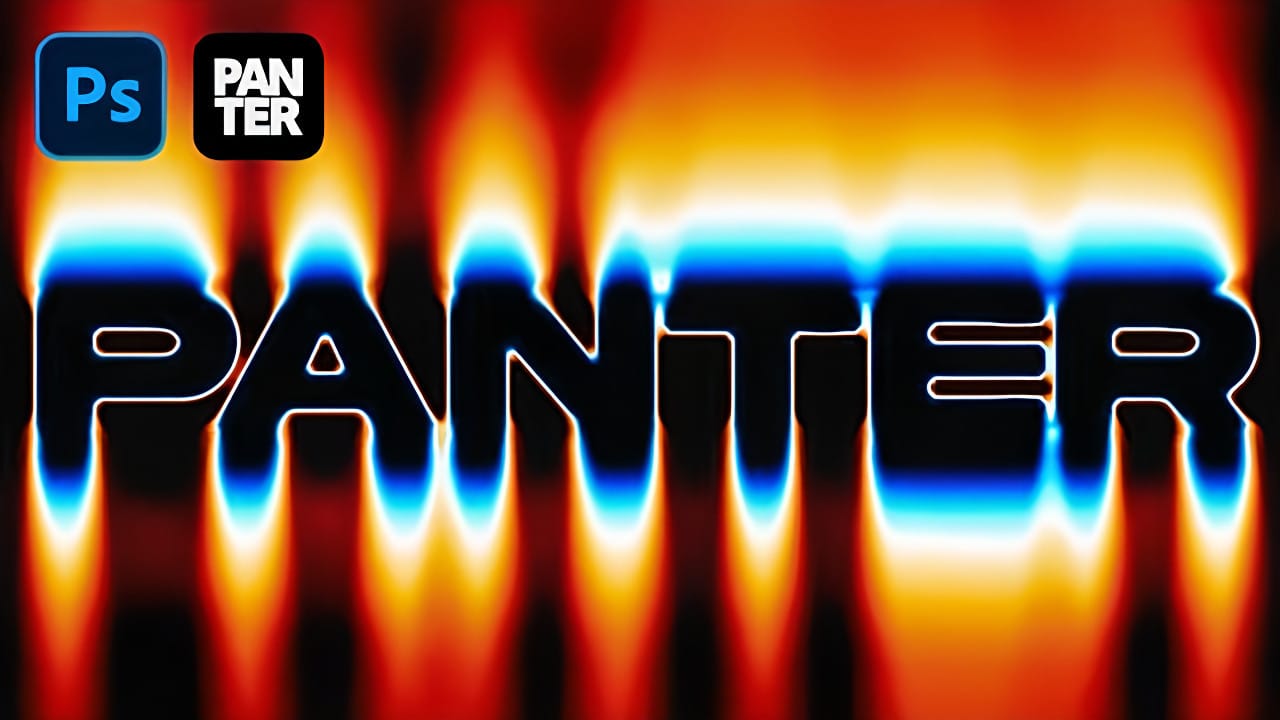
Spinning text effects with motion blur create the illusion of dynamic movement and energy in digital designs. This visual technique transforms static typography into something that appears to be rotating rapidly through space, leaving trailing blur patterns that catch the eye.

The combination of circular text arrangement, perspective distortion, and layered motion blur produces a sophisticated three-dimensional effect that works well for logos, titles, and creative compositions.

Watch the Video

Video by P A N T E R. Any links or downloads mentioned by the creator are available only on YouTube

Understanding Motion Blur for Typography

Motion blur in typography mimics the natural effect that occurs when objects move faster than the camera's shutter speed can capture. This photographic phenomenon translates well to digital design, where it suggests speed, energy, and movement.

The key to realistic motion blur lies in creating multiple layers with varying blur intensity and positioning. Each layer contributes to the overall sense of motion while maintaining the text's readability at the focal point.

  • Circular text paths provide the foundation for rotational effects
  • Perspective distortion adds three-dimensional depth to flat typography
  • Layered blur effects create realistic motion trails
  • Filter combinations enhance texture and visual complexity
  • Gradient mapping introduces dynamic color schemes

Practical Tips for Motion Blur Text

  • Convert text layers to smart objects before applying transformations to preserve editing flexibility
  • Use letter spacing of 100 or higher when creating circular text to prevent character overlap
  • Apply motion blur at 90-degree angles for vertical spinning effects
  • Create multiple blur layers with different distances and opacities for realistic depth
  • Position blur layers carefully to maintain the illusion of directional movement

Explore more techniques for creating dynamic text effects and motion graphics.

Generate a Perspective Motion effect with Photoshop
In this detailed tutorial, PiXimperfect demonstrates how to create a dynamic perspective motion effect in Photoshop. The lesson focuses on adding motion blur that aligns with the perspective of an object, making it appear as if it's moving rapidly through space. Using multiple paths to capture the perspective, you'll learn how to apply blur effects along these lines to simulate realistic motion. The tutorial covers advanced techniques with Path Blur to not only create motion but also enhance th
Create Fire Text with Motion Blur and Gradients in Photoshop
Fire text effects bring raw energy and dynamic movement to any design project. The combination of motion blur and colorful gradients creates the illusion of blazing flames trailing behind text, perfect for logos, posters, and dramatic typography. This technique transforms static lettering into something that appears to be racing across the screen, leaving a fiery wake behind it. Watch the Tutorial The Science Behind Motion Blur Effects Motion blur occurs naturally when objects move faster
How to Place Anything into Perspective in Photoshop
In this tutorial, we'll demonstrate a technique that allows you to seamlessly incorporate any object into a new scene, ensuring perfect perspective alignment. First, we'll guide you through the process of precisely cutting out the desired object using advanced selection tools. Next, we'll utilize the powerful Vanishing Point Filter to position the object within the target scene, aligning it perfectly with the existing perspective. But we don't stop there. To achieve a truly professional-looking
Quick and Easy Perspective Text in Photoshop
Integrating text seamlessly into photographic scenes can elevate a design, making static words appear as if they are a natural part of the environment. However, placing text onto non-flat surfaces like walls, floors, or objects with realistic perspective requires more than simple scaling or rotation—it demands a sophisticated approach to truly align with the scene's depth and angles. This video tutorial demonstrates a practical and efficient method for achieving this effect in Photoshop. Viewer

Get tutorials & freebies delivered to you.

Subscribe to the Photoshop Roadmap newsletter, a weekly roundup of new tutorials, insights and quality downloads, trusted by 6500+ readers.

You might also like

Complete Photoshop Editing Workflow: 5 Steps from Raw to Polished

Photoshop offers endless possibilities for photo enhancement, but many photographers never move beyond basic adjustments because the software feels overwhelming. This comprehensive workflow breaks down photo editing into five manageable stages that work consistently across different photography styles. The systematic approach covers everything from initial raw processing to advanced lighting...

Photoshop Workspace Basics: Navigation, Zooming, and Essential Interface Elements

Photoshop's interface can feel overwhelming when you first open the program. Dozens of panels, tools, and menus compete for attention, making simple tasks feel complicated. This tutorial breaks down the essential workspace elements and teaches fundamental navigation skills that form the foundation of efficient Photoshop work. Watch the...

How to Restore Old Damaged Photos Using Nano Banana in Photoshop

Old family photos with scratches, tears, and missing sections can seem beyond repair. Google's Nano Banana AI model, now integrated into Photoshop, makes full restoration possible in minutes rather than hours. This powerful tool excels at maintaining facial characteristics while automatically filling in damaged areas and adding realistic...

How to Get Higher Quality Results from Photoshop's Generative Fill Tool

Photoshop's Generative Fill creates impressive AI extensions, but the results often look blurry and pixelated when viewed at full size. This quality limitation makes many AI-generated areas unusable for printing or large displays. This technique shows how to work around the 1024x1024 pixel quality limit to create much...

How to Use Photoshop's Liquify Tool for Non-Destructive Portrait Retouching

Clothing wrinkles, hair that lacks volume, and awkward fabric bunching can distract from an otherwise great portrait. Photoshop's Liquify tool offers a powerful solution for smoothing out these issues while preserving the natural look of your subject. This tutorial demonstrates how to use the Liquify tool non-destructively with...

You’ve successfully subscribed to Photoshop Roadmap
Welcome back! You’ve successfully signed in.
Great! You’ve successfully signed up.
Success! Your email is updated.
Your link has expired
Success! Check your email for magic link to sign-in.