Creating a Dispersion Effect in Photoshop

Creating a Dispersion Effect in Photoshop

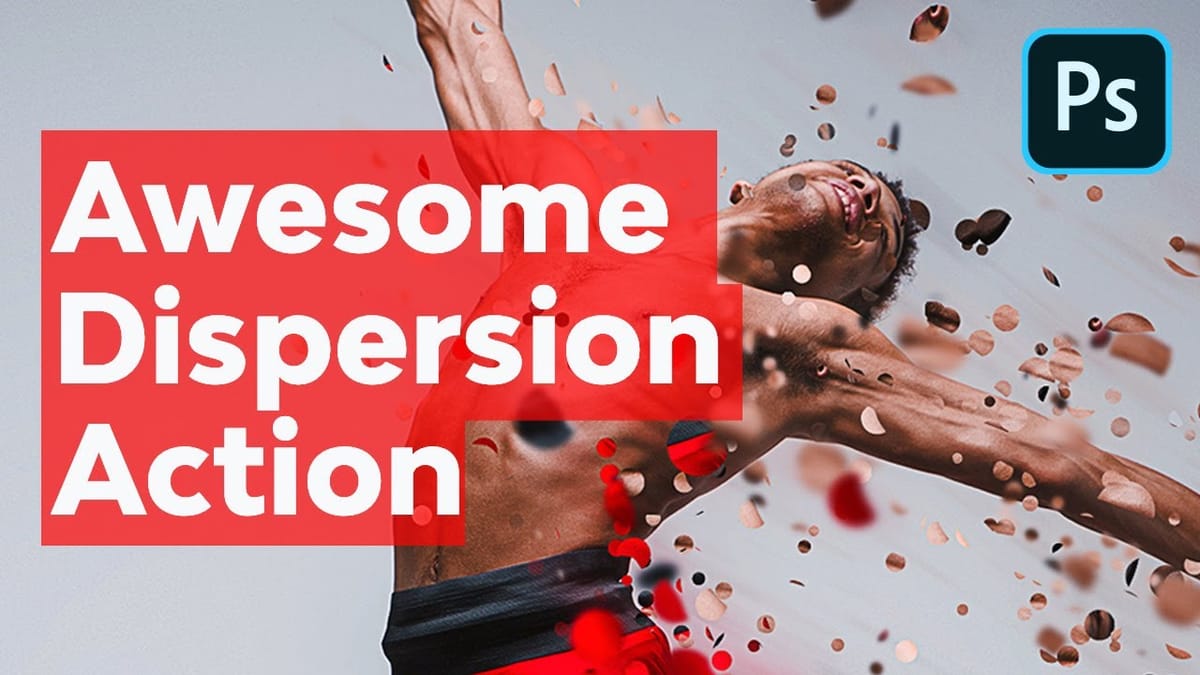
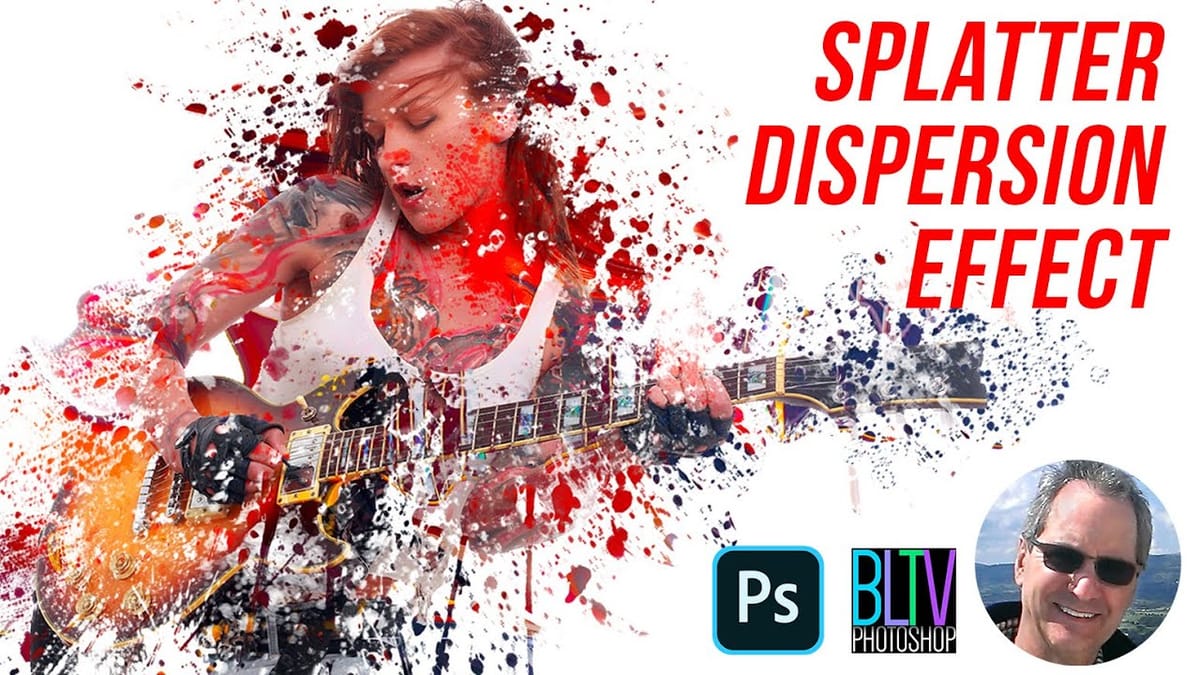
The dispersion effect transforms ordinary portraits into dynamic artwork by creating the illusion that parts of the subject are breaking apart and scattering into particles. This popular technique adds movement and drama to static images, making them perfect for creative projects, album covers, or eye-catching social media content.

This tutorial demonstrates a streamlined approach to creating professional dispersion effects using Photoshop's built-in tools. The process combines automated background removal with creative liquify techniques and special brushes to achieve a polished result that blends seamlessly with any background.

Watch the Tutorial

Any links or downloads mentioned by the creator are available only on YouTube

Understanding the Dispersion Effect Workflow

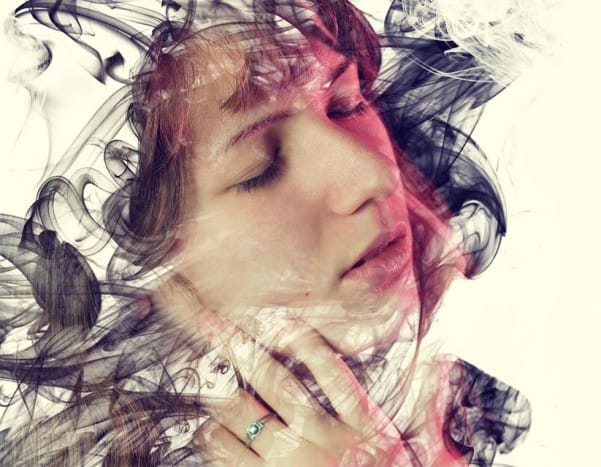
The dispersion effect relies on creating controlled chaos within an image. By strategically breaking apart sections of a subject and scattering them outward, designers can suggest motion, transformation, or disintegration. The technique originated from action photography and particle physics visualizations but has evolved into a versatile artistic tool.

Modern Photoshop workflows have simplified this once-complex process through automated selection tools and neural filters. The key to success lies in balancing the dramatic scattered elements with the intact portions of the subject. This creates visual tension that draws the viewer's eye across the composition. Essential components include:

  • Clean subject extraction from the original background
  • Strategic distortion using liquify tools
  • Selective reveal through layer masking
  • Color harmonization between subject and background

The beauty of this technique lies in its flexibility. While the fundamental approach remains consistent, each artist can achieve unique results by varying the direction, intensity, and pattern of the dispersion. Some prefer subtle particle effects that suggest gentle dissolution, while others create explosive compositions with dramatic scattering.

Practical Tips for Dispersion Effects

  • Start with high-resolution images to maintain quality when stretching and distorting pixels
  • Use varied brush sizes and opacities when revealing dispersed areas for more natural results
  • Apply liquify distortions in the direction of natural movement or wind flow
  • Keep an undistorted backup layer to blend back solid areas if needed
  • Experiment with different spatter brush patterns to create unique particle effects

Explore more creative dispersion techniques and variations with these tutorials.

How to Create an Awesome Dispersion Action in Adobe Photoshop
In this video tutorial, you will learn how to create an amazing dispersion effect in Adobe Photoshop. First, we will create several patterns that we will use for creating the dispersed parts. We will then define which areas of our photo we want to disperse and create the parts. After that, we will disperse them […] More
Create a pixelated dispersion effect in Photoshop
In this Photoshop tutorial you will learn how to create an awesome Pixelated dispersion effect just using a Pixel brush set, filters and more. Download work files here… More
Making a smoke dispersion effect in photoshop
In this photo effects tutorial you will learn how to create a face that looks like it was made from smoke and add some really good colors to it so it looks more professional. This video is pretty basic so beginners will also find it helpful. More
Create a Powerful Dispersion, Splatter Effect from a Photo in Photoshop – Photoshop Roadmap
In this video tutorial, Marty from Blue Lightning TV demonstrates how to create a dispersion splatter effect from a photo using Photoshop. The tutorial covers the entire process, from preparing the background and subject to applying the dispersion effect and enhancing the image’s vibrancy. Marty provides tips on using concrete

Get tutorials & freebies delivered to you.

Subscribe to the Photoshop Roadmap newsletter, a weekly roundup of new tutorials, insights and quality downloads, trusted by 6500+ readers.

You might also like

How to Create Circle Cropped Photos with Transparent Backgrounds in Photoshop

Circular cropping transforms standard photographs into clean, professional profile images perfect for websites, social media, and presentations. The frame tool method creates non-destructive crops with transparent backgrounds that export seamlessly across different platforms. This streamlined workflow eliminates the need for complex selections or masks while maintaining full control over image...

How to Use Generative Upscale to Restore and Enhance Low-Resolution Images in Photoshop

Low-resolution images often limit your creative projects, especially when you need sharp prints or high-quality displays. Photoshop's Generative Upscale feature transforms small, pixelated photos into crisp, detailed images using AI-powered enhancement. This tool offers three distinct AI models, each designed for specific image types—from landscapes and portraits...

How to Use Harmonize to Automatically Match Lighting in Photoshop Composites

Creating seamless composites traditionally requires hours of manual color correction and lighting adjustments. The new Harmonize tool changes this by automatically analyzing your background and matching your subject's lighting, shadows, and color tones with a single click. This AI-powered feature eliminates the need for complex adjustment layers and...

How to Use Adobe Photoshop in ChatGPT for Photo Editing

Adobe Photoshop is now integrated directly into ChatGPT, allowing you to edit photos using simple text descriptions. This new feature lets you enhance images, apply creative effects, and make targeted adjustments without needing a Photoshop subscription. You can describe what you want to change and fine-tune adjustments using familiar Photoshop...

How to Fix Skin Tones in Photoshop - Complete Guide

Skin tones can make or break a portrait, yet color casts and uneven lighting often leave subjects looking unnatural or flat. Whether dealing with mixed lighting conditions, camera white balance issues, or post-processing mishaps, getting skin colors right requires a systematic approach that works consistently across different scenarios. This comprehensive...

You’ve successfully subscribed to Photoshop Roadmap
Welcome back! You’ve successfully signed in.
Great! You’ve successfully signed up.
Success! Your email is updated.
Your link has expired
Success! Check your email for magic link to sign-in.