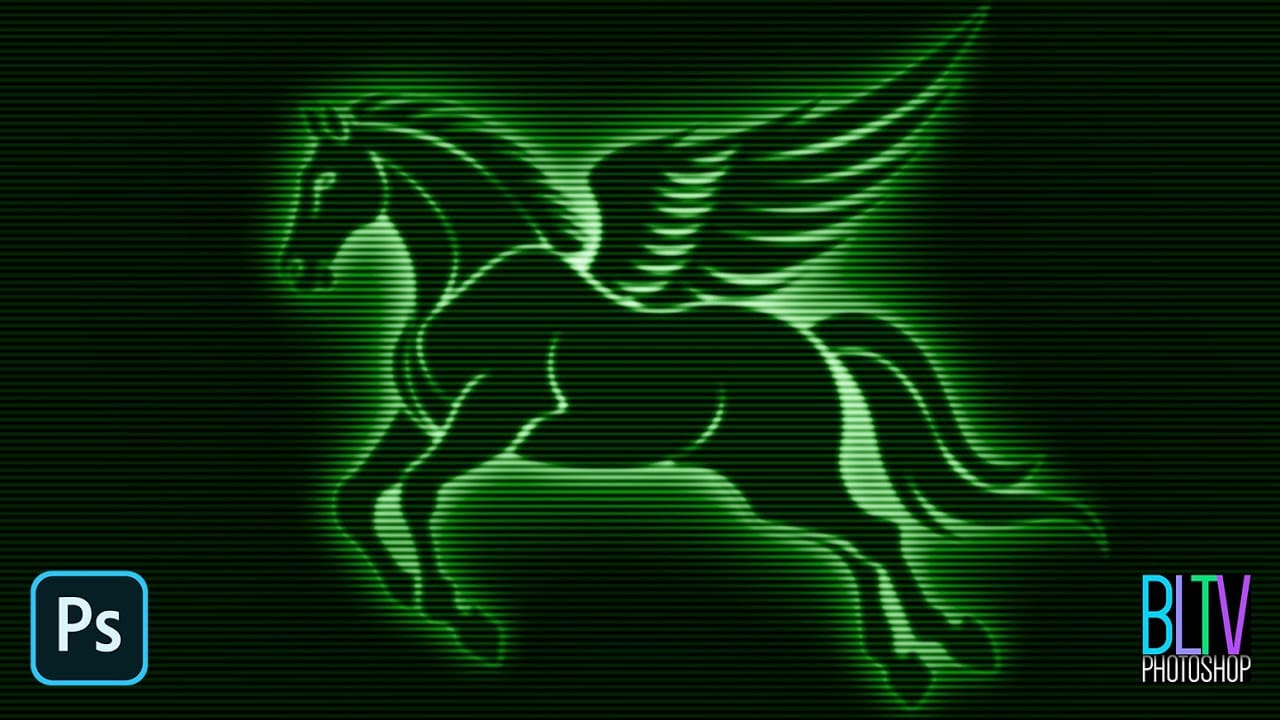
The distinctive glow of vintage computer monitors carries a powerful nostalgic appeal that transcends generations. Those chunky green pixels, flickering displays, and analog imperfections define an entire era of sci-fi aesthetics. From classic arcade games to retro-futuristic films, this visual language continues to captivate designers and artists.
This tutorial demonstrates how to simulate an authentic pixelated monitor effect in Photoshop using custom patterns and advanced blending techniques. The result goes beyond simple color overlays to create a genuine pixel grid that responds dynamically to your image content.
Watch the Tutorial
Video by Texturelabs. Any links or downloads mentioned by the creator are available only on YouTube
The Science Behind Monitor Pixel Simulation
Digital displays fundamentally work by controlling individual pixels that can only exist in specific states. Early monitors were particularly limited in their color range and resolution, creating the characteristic blocky appearance we associate with retro technology. The Hard Mix blending mode in Photoshop perfectly replicates this binary behavior by forcing pixels into pure black or white states based on their combined luminosity values.
The technique relies on custom pattern tiles containing multiple gray rectangles. When combined with underlying image data through Hard Mix blending, these rectangles selectively turn on or off based on the brightness values beneath them. This creates the illusion of actual monitor pixels responding to image content, much like how real displays modulate individual phosphor elements.
The Mosaic filter plays a crucial role by converting continuous image data into discrete blocks that align perfectly with the pattern grid. This preprocessing step ensures that each "pixel" in the final effect corresponds to a specific brightness value, maintaining the authentic digital display behavior throughout the image.
Practical Tips for Monitor Effects
- Use pattern tiles that are exactly the same dimensions as your Mosaic filter settings to ensure perfect alignment between the pixel grid and pattern overlay.
- Apply multiple Drop Shadow effects instead of Outer Glow to create more realistic monitor phosphor bleeding and ghosting artifacts.
- Convert your base layer to a Smart Object before applying filters so you can easily adjust Mosaic size and source images non-destructively.
- Enable "Snap to Origin" when positioning pattern overlays to guarantee proper alignment with the document's top-left corner.
- Group your pixelated layer before adding glow effects to isolate the complex blending modes from the final styling treatments.
Related Articles and Tutorials
Explore more retro and sci-fi visual effects for your creative projects.