Create a Distorted Photocopy Scan Effect in Photoshop

Create a Distorted Photocopy Scan Effect in Photoshop

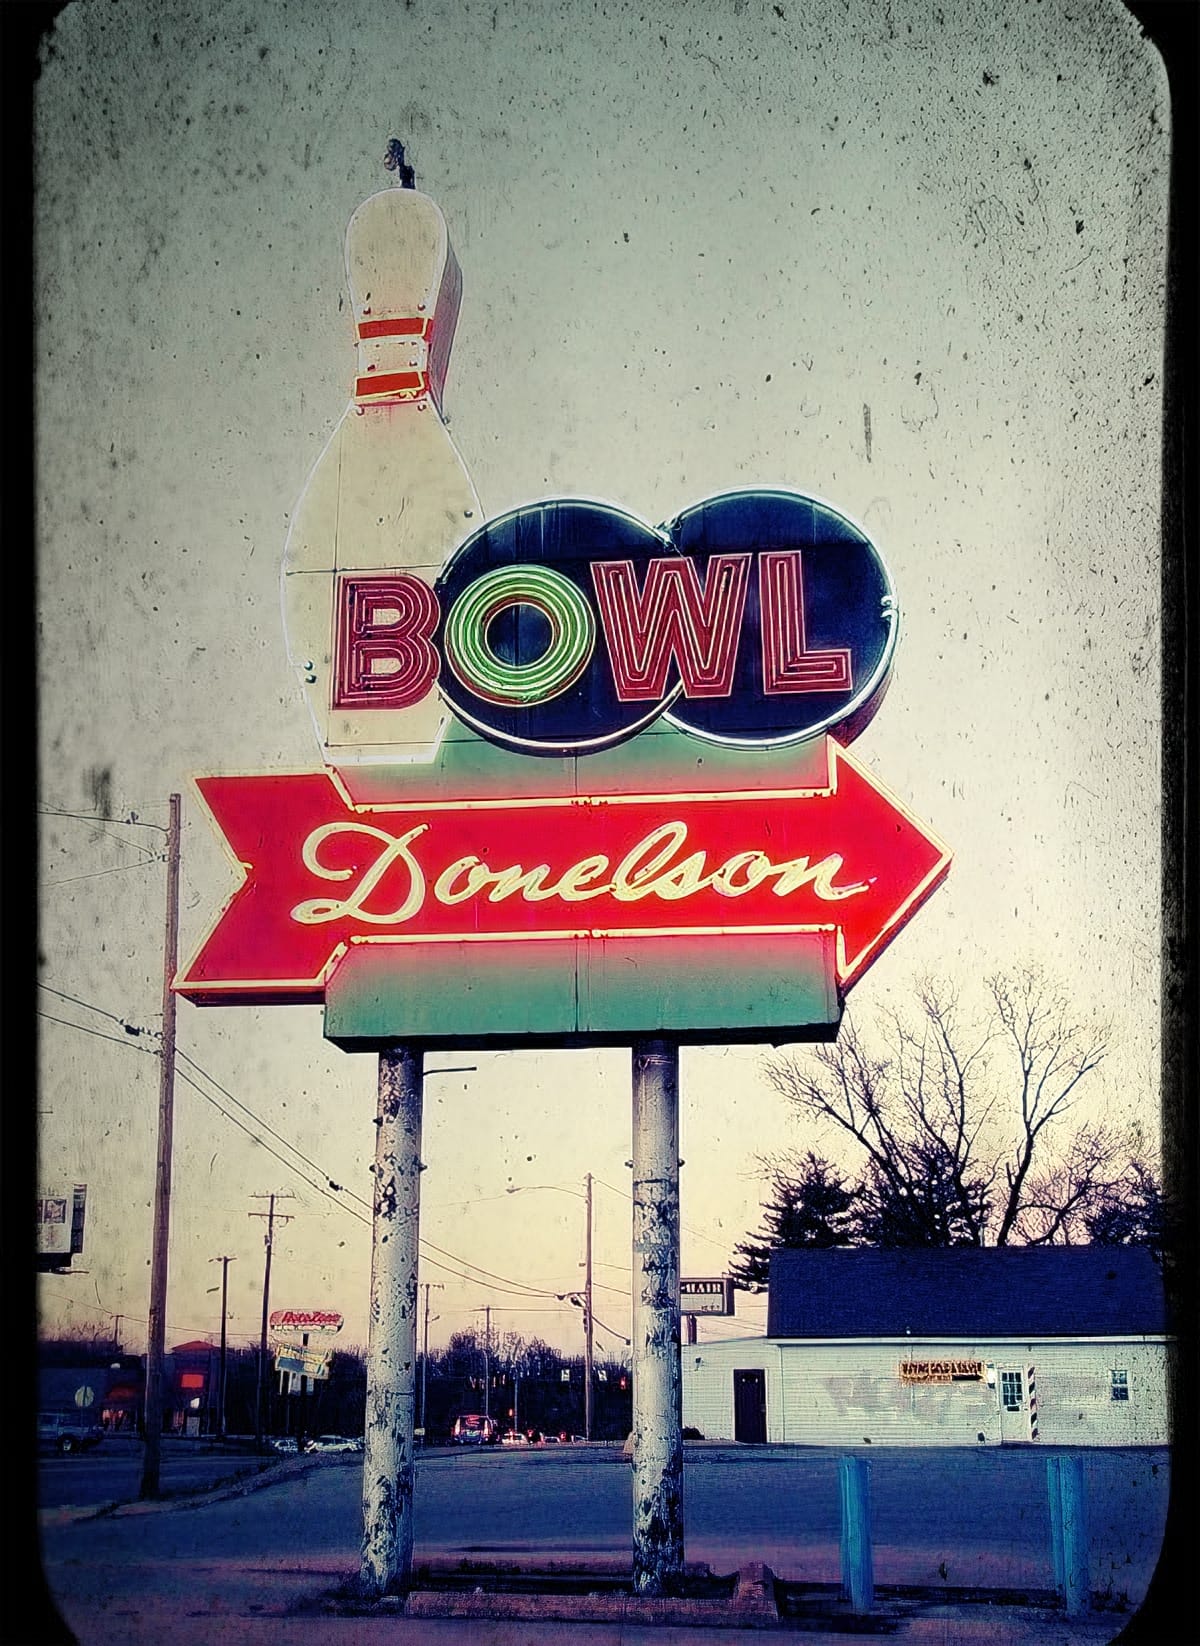
Vintage photocopy effects capture the imperfect charm of analog reproduction—those streaky scan lines, halftone dots, and mysterious distortions that made every copy slightly different. These gritty, mechanical textures add authentic character to digital designs, evoking the era when photocopiers were the primary way to duplicate documents and images.

This video demonstrates how to recreate that distinctive look using Photoshop's filter gallery and liquify tools to build convincing photocopy distortions from scratch.

Watch the Tutorial

Video by P A N T E R. Any links or downloads mentioned by the creator are available only on YouTube

The Art of Analog Imperfection

Photocopy aesthetics emerged from the limitations of xerographic technology, where light scanned across documents to create electrostatic impressions on photosensitive drums. This mechanical process introduced characteristic artifacts: halftone patterns from the screening process, streaky distortions from drum irregularities, and grain from the toner application method.

Modern designers embrace these "flaws" because they signal authenticity in an increasingly digital world. The technique works particularly well for:

  • Punk and underground music artwork
  • Zine-style editorial designs
  • Nostalgic branding projects
  • Distressed poster effects

The key to convincing photocopy effects lies in layering multiple imperfections—combining halftone patterns with grain textures, then adding the directional streaking that made photocopiers notorious for their unpredictable output quality.

Practical Tips for Photocopy Effects

  • Convert your layer to a smart object before applying filters to maintain editability and experiment with different settings non-destructively.
  • Use the Push Left tool in Liquify to create realistic streaking by dragging consistently in one direction rather than random distortion.
  • Layer multiple filter effects—start with halftone patterns, add grain textures, then finish with subtle wave distortion for authentic analog imperfection.
  • Split your image into sections and apply different distortion intensities to mimic how photocopiers created uneven results across the page.
  • Keep halftone dot sizes small (around 5 pixels) and contrast high to replicate the harsh black-and-white reproduction of vintage machines.

More Tutorials about Grunge Effects

Explore additional techniques for creating vintage and distressed visual effects.

Grunge and Dirty Retro Photo Effect in Photoshop
In this tutorial we are going to learn how to give a grunge dirty retro photo effect to any image in a quick and easy way. For this matter we are going to use the awesome Perfect Effects Free Edition Photoshop plugin, which is, by the way, absolutely free. 👁️This is an older tutorial, and some external links or data sources mentioned may no longer be accessible. However, the content covers a unique topic and remains valuable despite any broken connections. We've kept the post intact for its ed
Add a Grungy and Scratched Frame to a Photo in Photoshop
In this Photoshop tutorial by Gavin Hoey, learn how to enhance a photo of a lighthouse by applying a grungy texture and frame. The tutorial demonstrates how to use Photoshop to add a historical and weathered feel to your image, evoking a sense of nostalgia and mystery. The solitary lighthouse, standing tall against a desolate coastal landscape, symbolizes hope and guidance. By following this step-by-step guide, you'll see how to create a captivating visual story that highlights elements of iso
Create an awesome grainy scan-line text effect in Photoshop
In this tutorial by Blue Lightning TV, you'll learn how to create an awesome CRT scan-line text effect with digital glitches from scratch using Adobe Photoshop. The tutorial guides you through a few easy steps to achieve this retro and glitchy aesthetic. You'll explore techniques to simulate CRT monitor scan-lines, add digital glitches, and apply effects to text, creating a unique and visually dynamic result Whether you're nostalgic for retro tech aesthetics or looking to add a futuristic glit
How to Make Grungy Ghost Text Effects in Photoshop
Ghost text effects combine ethereal transparency with gritty texture to create typography that feels both haunting and visually striking. This design technique has become increasingly popular in horror-themed projects, album covers, and creative branding where designers want to convey mystery or edginess. This tutorial demonstrates how to build a convincing grungy ghost text effect using Photoshop's blur gallery, blend modes, and texture techniques. You'll learn to create translucent, distorted

Get tutorials & freebies delivered to you.

Subscribe to the Photoshop Roadmap newsletter, a weekly roundup of new tutorials, insights and quality downloads, trusted by 6500+ readers.

You might also like

Creating Pixelated Dither Effects in Photoshop

The pixelated dither effect transforms modern photographs into retro-inspired artwork reminiscent of early video games and vintage computer graphics. This distinctive visual style uses controlled color reduction and strategic pixelation to create images that balance nostalgic charm with contemporary design appeal. The technique relies on Photoshop's export settings...

How to Create a Vector Stencil from a Portrait Using Photoshop and Illustrator

Stencil art transforms complex portraits into bold, graphic statements using just black and white shapes. This simplified aesthetic has defined everything from street art to commercial design, creating instantly recognizable images that work across any medium. This tutorial demonstrates the complete workflow for converting a photograph into a clean vector...

How to Create Dotted Halftone Motion Blur Effects in Photoshop

The distinctive look of dotted halftone patterns combined with dynamic motion blur creates striking visual effects that bridge vintage print aesthetics with modern digital design. This technique transforms portrait photography into graphic art pieces with flowing, particle-like textures. The process involves layering multiple filter effects to achieve that coveted Instagram-worthy...

Master Photoshop Adjustment Layers for Non-Destructive Editing

Fine-tuning images without destroying original pixel data transforms ordinary photos into compelling visuals. Adjustment layers provide the flexibility to experiment with colors, contrast, and tones while maintaining complete control over every edit. This comprehensive guide demonstrates how to harness Photoshop's most powerful adjustment layers for landscape photography, from...

Understanding Color Theory for Digital Image Editing

Color theory forms the foundation of every successful digital editing project. From the visible spectrum to RGB channels, understanding how colors interact determines whether your adjustments look natural or artificial. This comprehensive breakdown covers essential color models, temperature and tint relationships, and the practical connections between traditional color theory and...

You’ve successfully subscribed to Photoshop Roadmap
Welcome back! You’ve successfully signed in.
Great! You’ve successfully signed up.
Success! Your email is updated.
Your link has expired
Success! Check your email for magic link to sign-in.